Log in to your Aruba (Master) IAP
Under Network at the botttom of the table, click on Plus icon
Configure with:
- Name (SSID): Guest WiFi (or whatever you wish)
- Primary usage: Guest

Click Next and configure with:
- Client IP assignment: Network assigned
- Client VLAN assignment: Default (unless you have a custom VLAN set up)

Click Next and configure with:
- Splash page type: External
- Captive portal profile: Click the plus icon. Configure with:
- Name: Flame-CPW (or whatever you wish)
- Type: Radius Authentication
- IP or hostname: IP/hostname for flame server*
- URL: URL for splash page*
- Port: 443
- Use https: Enabled
- Captive portal failure: Deny internet
- Automatic URL whitelisting: Disabled
- Redirect URL: URL redirection*
Click OK to save
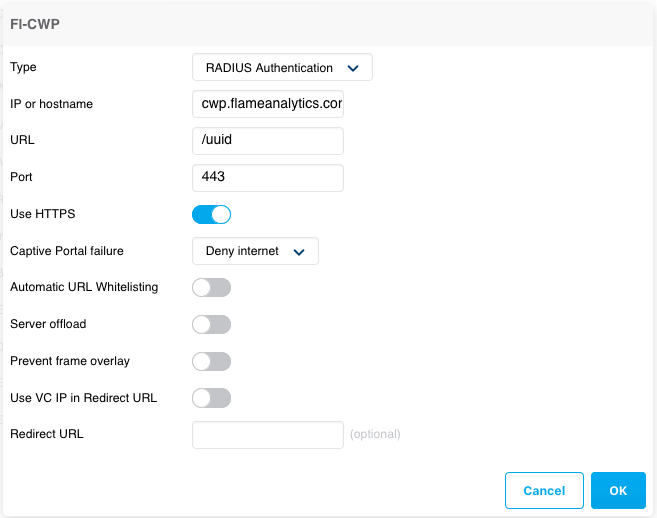
* The portal IP/Hostname and URL with UUID are given by the support department, get in touch at support@flameanalytics.com
- Auth server 1: Click the plus icon. Configure with:
- Type: RADIUS
- Name: Flame-Radius
- IP address: IP/hostname for flame authentication server*
- Auth port: 1812
- Acct port: 1813
- Shared key: Secret key*
- Retype key: Secret key*
Click OK to save

* The portal IP and Shared key are given by the support department, get in touch at support@flameanalytics.com
- Reauth interval: 24 hrs
- Accounting: Enabled
- Accounting mode: Authentication
- Accounting interval: 3 min
- Blacklisting: Disabled
- Walled garden: Click the link "Blacklist: 0 Whitelist: 0" and you will see the below screen:
Under Whitelist Click New and add all the below domains one by one until all are in the list:
- cwp.flameanalytics.com
- flameanalytics.com
- s3-eu-west-1.amazonaws.com
- s3-sa-east-1.amazonaws.com
To support social network logins, you also need to add the domains below:
facebook.com
facebook.net
akamaihd.net
fbcdn.net
atdmt.com
fbsbx.com
doubleclick.net
google.com
googleapis.com
googleusercontent.com
ssl.gstatic.com
accounts.google.es
twitter.com
twimg.com
linkedin.com
licdn.com
Press OK when all the domains have been added
If the section does not appear for any reason, this section and URL's will have to be added through CLI.
Walled Garden (CLI)
If for some reason, the Walled Garden option does not appear, we must connect to the device through ssh and use the CLI commands to add this section. For that, these are the commands you must enter to complete this configuration:
# configure terminal

(config) # wlan walled-garden

(Walled Garden) # white-list <url>
(Walled Garden) # white-list ....
....
(Walled Garden) # end

# commit apply
These are the list, that you must to introduce in white-list:
- cwp.flameanalytics.com
- flameanalytics.com
- s3-eu-west-1.amazonaws.com
If you support network logins, you must also introduce these:
facebook.com
facebook.net
akamaihd.net
fbcdn.net
atdmt.com
fbsbx.com
doubleclick.net
google.com
googleapis.com
googleusercontent.com
ssl.gstatic.com
accounts.google.es
twitter.com
twimg.com
linkedin.com
licdn.com
Result:

Click Next and configure with:
- Access Rules: Role-based
Under Roles click Plus icon and enter Preauth as the name
Under Access Rules for Preauth click New and add the following rule:
- Rule type: Access control
- Service: Network - any
- Action: Allow
- Destination: to domain name
- Domain name: domain.name

Domain list:
- cwp.flameanalytics.com
- flameanalytics.com
- s3-eu-west-1.amazonaws.com
To support social network logins, you also need to add the domains below:
facebook.com
facebook.net
akamaihd.net
fbcdn.net
atdmt.com
fbsbx.com
doubleclick.net
google.com
googleapis.com
googleusercontent.com
ssl.gstatic.com
accounts.google.es
twitter.com
twimg.com
linkedin.com
licdn.com
- Assign pre-authentication role: select Preauth
Click Finish to complete the set up.
Was this article helpful?
That’s Great!
Thank you for your feedback
Sorry! We couldn't be helpful
Thank you for your feedback
Feedback sent
We appreciate your effort and will try to fix the article