Supported devices: Cisco 3500 series Wireless controller with firmware 8.5.105.0z
1. Create a New WLAN
- Navigate to WLANs > Create New > Go
- Enter the following details:
- Profile name: Social Wi-Fi
- SSID: FREE_WIFI
- Click Apply to save the changes
2. Configure DHCP server
- Navigate to Controller > Internal DHCP Server > DHCP Scope > New
- Enter the following:
- Scope Name: DHCP_SocialWiFi
- Click Apply
- Select the created scope to configure it. Example configuration:
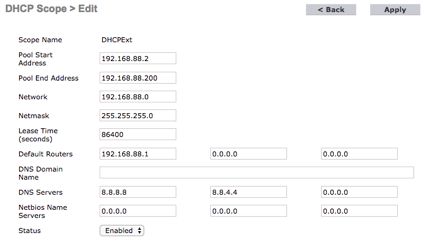
- Click Apply to save the changes
- Navigate to Controller > Advanced > DHCP
- Enable the Enable DHCP Proxy option
- Click Apply to save the changes
- Navigate to Controller > Interfaces
- Select the desired interface
- In the Primary DHCP Server field under DHCP Information, enter:
- Primary DHCP Server: 192.168.88.201
- Click Apply to save the changes
3. Configure RADIUS
- Navigate to Security > AAA > RADIUS > Authenticationand configure:
- Auth Called Station ID Type: AP MAC Address
- MAC Delimiter: Colon
- Click apply
- Click New and configure:
- Server Address(Ipv4/Ipv6): 34.243.101.199
- Shared Secret Format: ASCII
- Shared Secret: <provided by Flame>
- Confirm Shared Secret: <provided by Flame>
- Port Number: 1812
- Server Status: Enabled
- Click Apply
- Navigate to Security > AAA > RADIUS > Accounting and configure:
- Auth Called Station ID Type: AP MAC Address
- MAC Delimiter: Colon
- Click Apply
- Click Newand configure:
- Server Address(IPv4/IPv6): 34.243.101.199
- Shared Secret Format: ASCII
- Shared Secret: <Provided by Flame>
- Confirm Shared Secret: <provided by Flame>
- Port Number: 1813
- Server Status: Enabled
- Click apply
4. Configure ACLs
- Navigate to Security > AAA > Access Control Lists > Access Control Lists > New and configure:
- Access Control List Name: PreAuthACL
- ACL Type: IPv4
- Click Apply
- Edit the newly created ACL and select Add-Remove URL
- Add cwp.flameanalytics.com y securelogin.flameanalytics.com in the URL String Name and click Add
- If social login is enabled, add the following URLs:
- Navigate to Security > AAA > Access Control Lists > Access Control Lists > New and configure:
- Access Control List Name: PostAuthACL
- ACL Type: IPv4
- Click Apply
- Click en la ACL creada
- Edit the newly created ACL and click Add New Rule:

- Click Apply
5. Configure the captive portal
- Navigate to Security > Web Auth > Web Auth Login Page and configure:
- Web Authentication Type: External (Redirect to external server)
- Redirect URL: <provided by Flame>
- Login Success Page Type: None
- External Webauth URL: <provided by Flame>
- Click Apply
- Navigate to Management > HTTP-HTTPS > Download SSL Certificate. Download the SSL certificate provided by Flame using the TFTP configuration details (also provided by Flame).
- Click Apply and Save Configuration
- Navigate to Controller >Interfaces > Virtual and configure:
- DNS gateway hostname: securelogin.flameanalytics.com
- Restart the controller: Commands > Reboot > Reboot > Save and Reboot
- Navigate to WLANs > WLANs and select the WLAN ID created earlier
- Under the General tab Set the Interface/Interface Group(G) to the desired interface.
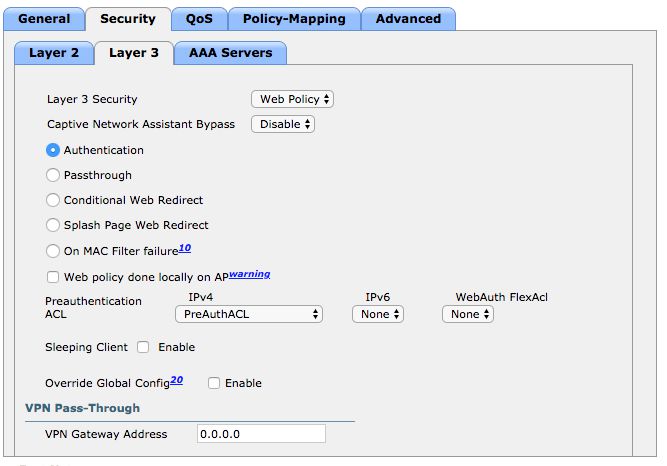
- Under the Security tab configure:
- Layer 2
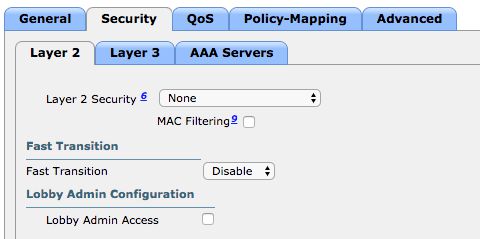
- Layer 2
- Layer 3
- AAA Servers
- RADIUS Server Overwrite interface: Enabled
- Authentication Servers: Enabled and select the previously configured server, the one with port 1812
- Accounting Servers: Enabled and select the previously configured server, the one with port 1813
- Interim Update: Disabled
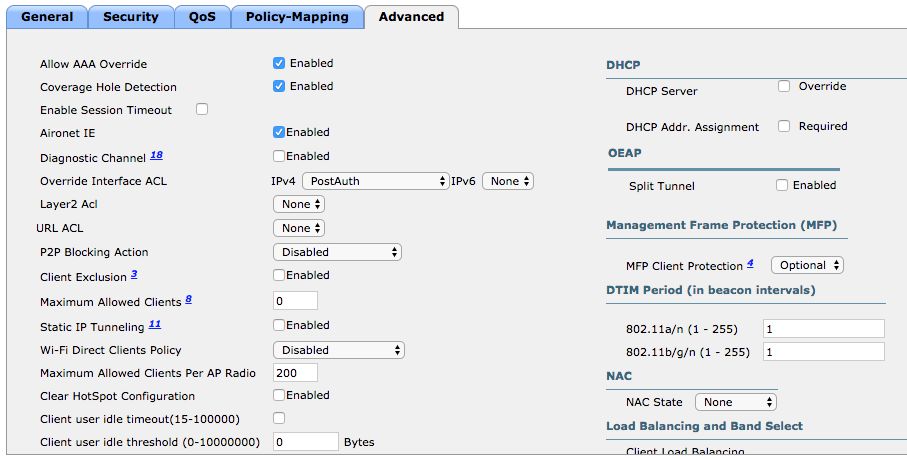
- Under Advanced tab:
 11. Click Save Configuration
Was this article helpful?
That’s Great!
Thank you for your feedback
Sorry! We couldn't be helpful
Thank you for your feedback
Feedback sent
We appreciate your effort and will try to fix the article